This utility program manages a server install with one or many Moxie.Build services running by taking care of nightly tasks via a scheduled task.
This short HowTo details the install of a test environment on say a laptop to model a basic framework to effect the management of multiple Moxie Servers on either a Bare Metal or Cloud Server.
Required for the test environment:
• Windows 10 Pro (Laptop or Desktop) [untested on Windows 10 Home]
• You must be able to ≤Right Click≥ on an exe file and select “Run as Administrator”
• An install of hMailServer on localhost acting as a SMTP relay can be helpful at times but is not mandatory for a test environment and, if present in a test environment, should be set to deliver all email to an address you control.
• 2 drives; namely
• C:Drive (Holds C:\Backup\* which is created automatically)
• D:Drive (~2-4 GB free for test purposes)
• If you have a D: Drive already, skip ahead to the "Installation" heading, otherwise,
? To shrink C: Drive and make that freed up space into a New Simple Volume...
? press and release the Windows Key to get the search menu
? type in Administrative Tools and click to open
? double click "Computer Management"
? Click on Disk Management
? ≤Right Click≥ on C: drive and select Shrink Volume…
? Amount of space to shrink in MB ... 4000 and select Shrink
? If this doesn't work, do not proceed until you have 2-4 GB free to make a D:drive.
• There are tutorials available for this on the net.
? Once shrunk, ≤Right Click≥ on the Unallocated space and select …
• New Simple Volume…
? follow the resulting New Simple Volume Wizard to create a D: Drive
Installation
Setup the hosts file so we can refer to the test sites by unique name.
This allows us to be logged into different "localhost" sites simultaneously.
≤Right Click≥ on the Task Bar
select Task Manager
In Task Manager
≤alt≥ f (opens the File menu)
Run a new task
Type in Notepad and CHECK: Create this task with administrative privileges.
... and click ≤OK≥ to give effect
In Notepad (now as admin)
≤Ctrl≥ o (opens the Select File To Edit dialog)
Drill down to:
C:\Windows\System32\drivers\etc
Ensure that:
All Files (*.*) is selected
≤Click to select≥ "hosts"
Click Open
Ensure the following space separated host names are included somewhere in the 127.0.0.1 line. There will be other names on that line already and leaving them there is perfectly okay but, we will require these three. Note: Windows internal rDNS requires the word localhost immediately follow 127.0.0.1
127.0.0.1 localhost local.site1.com local.site2.ca
save and close
Do note that on an actual bare metal or cloud system, the hosts file is seldom touched as all DNS resolution is handled externally.
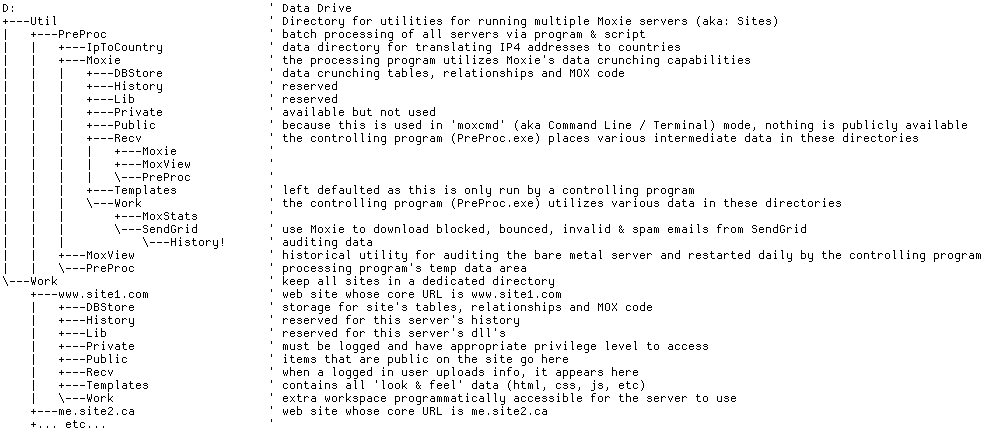
If the D.zip file has not been downloaded and expanded into D:Drive, do so now --- such that the layout matches the following:
There are 4 new users to create for this test install and they will belong to a special “Moxies” group while their normal “Users” privileges will be revoked. The “Moxies” group will have special privileges assigned to it.
• each Moxie Server should be under a separate "User" for security.
• each Moxie Server should have its own unique password for security. As this is a test environment, the same password can be used through out. Do note that what ever password is used for each user - will need to be used to 'install' that particular Moxie Server a bit later in the procedure.
press and release the Windows Key to get the search menu
type in Administrative Tools and click to open
double click "Computer Management"
Drill down to:
Computer Management (local) ≥≥ System Tools ≥≥ Local Users and Groups
≤Right Click≥ on Users then select “New User ...”
New User "mb-localhost888"
username: mb-localhost888
FullName: mb-localhost888
pass: ≤yourpass888here≥
confirm: ≤yourpass888here≥
UNCHECK: User must change password at next login
CHECK: User cannot change password
CHECK: Password never expires
≤Create≥
New User "mb-test"
username: mb-test
FullName: mb-test
pass: ≤yourpasshere≥
confirm: ≤yourpasshere≥
UNCHECK: User must change password at next login
CHECK: User cannot change password
CHECK: Password never expires
≤Create≥
New User "mb-test1"
username: mb-test1
FullName: mb-test1
pass: ≤yourpass1here≥
confirm: ≤yourpass1here≥
UNCHECK: User must change password at next login
CHECK: User cannot change password
CHECK: Password never expires
≤Create≥
New User "mb-test2"
username: mb-test2
FullName: mb-test2
pass: ≤yourpass2here≥
confirm: ≤yourpass2here≥
UNCHECK: User must change password at next login
CHECK: User cannot change password
CHECK: Password never expires
≤Create≥
New Group "Moxies"
Group name: Moxies
Description: Moxies
≤Create≥
Goto the new Group "Moxies"
Click on "Users" (Users is highlighted)
Click ≤Remove≥
Click ≤Add≥
Enter the object:
mb-localhost888
≤OK≥
Click ≤Add≥
Enter the object:
mb-test
≤OK≥
Click ≤Add≥
Enter the object:
mb-test1
≤OK≥
Click ≤Add≥
Enter the object:
mb-test2
≤OK≥
... and click ≤OK≥ to close the dialog box
Goto the existing Group “Users”and double click to open it
≤Click to select≥ mb-localhost888 and click Remove
≤Click to select≥ mb-test and click Remove
≤Click to select≥ mb-test1 and click Remove
≤Click to select≥ mb-test2 and click Remove
... and click ≤OK≥ to close the dialog box
Press and release the Windows Key to get the search menu
type in Administrative Tools and click to open
double click "Local Security Policy"
drill down to Security Settings ≥≥ Local Policies ≥≥ User Rights Assignment
highlight each of the following (in turn) and press ≤enter≥ to open each dialog...
Deny access to this computer from the network
Deny log on as a batch job
Deny log on locally
Deny log on through Remote Desktop Services
then...For each Properties dialog...
Click "Add User or Group"
Click "Object Types"
CHECK: Groups
≤OK≥
Enter the object name to select:
Moxies
≤OK≥
... and click ≤OK≥ to close the dialog box
(repeat for each in the above list)
highlight…
Log on as a service
and press ≤enter≥ to open then...
Click "Add User or Group"
Click "Object Types"
CHECK: Groups
≤OK≥
Enter the object name to select:
Moxies
≤OK≥
... and click ≤OK≥ to close the dialog box
Install the first test site and set some “Setup” values
Using Explorer, drill down to D:\Work\local.site1.com
≤Right Click≥ on Moxie.exe
Select Run as administrator and allow the elevated privilege
(The Moxie.Build Server Setup screen opens with preselected values shown for a localhost install)
Click on the Green Plus (+) to initiate the install mechanism (Enter user password screen opens)
Enter the password you made above for the username mb-test1 and click the green 'check' icon
The 'Current Server State' area should have a highlighted Green 'Play' icon.
If an error message box poped up, retrace the prevous steps to throubleshoot
Click the highlighted Green 'Play' icon, in a moment, the status will go from Stopped to Started.
If an error message box poped up, retrace the prevous steps to throubleshoot
at this point, open your web browser to: (you may want to bookmark this in your browser)
http://local.site1.com:801/Admin
and enter the following (default) username and password
user name: admin
password: admin
The browser will open to the 'Admin' web page (aka: screen or window)
A second level of access is required to get to the hard internals.
In the hamburger menu, Click on the 'System' button near the top of the page
(the DB Admin Control page opens)
enter the user name: admin password (above) a second time to gain access to this level
In the hamburger menu, Click on the 'Tables' button near the top of the page
(all the Moxie Tables are shown)
Near the bottom of the page is the 'Root' section. In this section, click on the 'Setup' button
(a browsing page is shown containing the values in the 'Setup' table)
Change the 'Show 10 entries' to read: 'Show 100 entries'
• on the browsing page, change each of these 4 values (below) to match what your email system uses. If a value is not used, set it to a single hyphen. If you are not using the email system, set all email addresses to a single hyphen
| Alias | Value |
| Cnw.EmailErrFrom | [email protected] |
| Cnw.EmailErrTo | [email protected] |
| Cnw.EmailIPAdminFrom | - |
| Cnw.EmailIPAdminTo | - |
Install the second test site and set it’s basic ‘Setup’ values
Using Explorer, drill down to D:\Work\local.site2.ca
≤Right Click≥ on Moxie.exe
Select Run as administrator and allow the elevated privilege
(The Moxie.Build Server Setup screen opens with preselected values shown for a localhost install)
Click on the Green Plus (+) to initiate the install mechanism (Enter user password screen opens)
Enter the password you made above for the username mb-test2 and click the green 'check' icon
The 'Current Server State' area should have a highlighted Green 'Play' icon.
If an error message box poped up, retrace the prevous steps to throubleshoot
Click the highlighted Green 'Play' icon, in a moment, the status will go from Stopped to Started.
If an error message box poped up, retrace the prevous steps to throubleshoot
at this point, open your web browser to: (you may want to bookmark this in your browser)
http://local.site2.ca:802/Admin
and enter the following (default) username and password
user name: admin
password: admin
(the same setup values should be set/reset as per above)
Configuration
Implement the ProProc mechanism which handles log rotate, processing and backup snapshots.
1st step, open D:\ Util\ProProc\ProProc.conf with your favorite editor and modify the email addresses to match
your configuration if applicable
# ------------------------------- ProProc.conf ------------------------# Emails below are one email per line; as many lines as required# Any line containing a Hash '#' will be ignored# ---------------------------------------------------------------------
# The root folder containing all Moxie server folders[ObjectRootFolder]U:\Work
# Send all backup files to this root folder[BackupRootFolder]C:\Backup3
# Regarding /AllOn and /AllOff arguments:# RootOnOffFolder(x) are searched two folders deep to find Moxie.exe files# RootOnOffFolderUnique(x) are searched in that folder only for a Moxie.exe file# When a Moxie.exe file is found, it:# will be stopped with a /AllOff command line option# will be started with a /AllOn command line option# No errors will be returned on success or failure for these folders#*Note* To temporarily exclude a folder, stop the Moxie service, # and rename it to say, Moxie.exe.off and it will be skipped.
[RootOnOffFolder1]U:\Temp
[RootOnOffFolder2]U:\Testing\Temp
[RootOnOffFolder3]C:\Backup\Temp
[RootOnOffFolder4]D:\Temp\Stage
[RootOnOffFolder5]
[RootOnOffFolder6]
[RootOnOffFolder7]
[RootOnOffFolder8]
[RootOnOffFolder9]
[RootOnOffFolder1Unique]
[RootOnOffFolder2Unique]
[RootOnOffFolder3Unique]
[RootOnOffFolder4Unique]
[RootOnOffFolder5Unique]
[RootOnOffFolder6Unique]
[RootOnOffFolder7Unique]
[RootOnOffFolder8Unique]
[RootOnOffFolder9Unique]
# End of /AllOn and /AllOff arguments:
# Eamil Notification related configs:
[MailServer:Port]mail.topdomain.top:25
[MailFrom][email protected]
[Force.Cnw.EmailErr][email protected]
[EmailOnError][email protected][email protected]
[EmailNoError][email protected]
[MoxieOnError][email protected]
# ------------------------------- END ProProc.conf ------------------------
Save and close
2nd step, in the D:\ Util\ProProc\Moxie directory, double click “Moxie.Run Server as App.bat”
(the RunAsAppOnly – Moxie.Build dialog box opens)
Open your web browser to: (you may want to bookmark this in your browser)
http://localhost:34999/Admin
and enter the following (default) username and password
user name: admin
password: admin
The browser will open to the 'Admin' web page (aka: screen or window)
A second level of access is required to get to the hard internals.
In the hamburger menu, Click on the 'System' button near the top of the page
(the DB Admin Control page opens)
enter the user name: admin password (above) a second time to gain access to this level
In the hamburger menu, Click on the 'Tables' button near the top of the page
(all the Moxie Tables are shown)
Near the bottom of the page is the 'Root' section. In this section, click on the 'Setup' button
(a browsing page is shown containing the values in the 'Setup' table)
Change the 'Show 10 entries' to read: 'Show 100 entries'
• on the browsing page, change each of these 6 values (below) to match what your email system uses. If a value is not used, set it to a single hyphen. If you are not using the email system, set all email addresses to a single hyphen
| Alias | Value |
| Cnw.EmailErrFrom | [email protected] |
| Cnw.EmailErrTo | [email protected] |
| Cnw.EmailIPAdminFrom | - |
| Cnw.EmailIPAdminTo | - |
| Moxie.ProProcSendGrid.Pass | SendGrid Password |
| Moxie.ProProcSendGrid.User | SendGrid User Name |
Kill the RunAsAppOnly – Moxie.Build dialog box.
3rd step, press and release the Windows Key to get the search menu
type in Administrative Tools and click to open
double click "Task Scheduler"
drill down to Task Scheduler Library
In the right hand panel, click Import Task …
Drill down and click to select D:\ Util\ProProc\ProProc LogRotate.xml
… and click Open
The Create Task window opens to confirm all settings. …
In the “General” tab, Click on “Change User or Group...”
In the resulting Select User or Group box...
enter the Administrator username and click "Check Names"
(an accepted username will be underlined)
Click OK
Click OK and confirm :
User Name: Administrator (only admin can successfully execute all NET commands)
Password: this computer’s admin password
Repeat the above for D:\ Util\ProProc\ProProc AllOn.xml
Repeat the above for D:\ Util\ProProc\ProProc AllOff.xml
Default Behavior and Processing Order
At this point, the ProProc AllOff Task will run nightly at 1:14AM. When it runs, it will, in directory listing order,:
- make a backup of each site's inportant data and save it to
C:\Backup\ - if Sendgrid values are valid, Perform Moxie.ProProc.SendGrid.mox to ProProcess rejected emails
- Stop each server
- Gather, zip, and backup each server's log files
- move dated report files to backup
- run each server's RunNightly.mox program in OffLine [MoxCmd] mode (server is not available via http or https)
- Start the server
- iterate to the next server in the list
- Once all servers have iterated, all of the site logs are appended into a single log file handy for server auditing (original log files are still backed up and remain with the site's backup)
- If enabled, a Success / Failure email is sent
Meta Moxie.cfg values
Sometimes, the overnight values should not have the defaults happening. To set defaults to something else explicitly, the Moxie.cfg file has Meta values that can be set to different defaults for a particular server only.
An example of an individual 'Meta =' value is Meta = Nightly-Session: NoReset
... which does not delete the session table overnight. (The default is to both backup and then delete the session table.)
Others are:
Meta = Nightly-Cnw.EmailErrFrom: [email protected] Meta = Nightly-Cnw.EmailErrTo: [email protected] Meta = Nightly-Cnw.EmailIPAdminFrom: [email protected] Meta = Nightly-Cnw.EmailIPAdminTo: [email protected]
Do note
- That these are case sensitive
- There must be a < colon >< space > separator between the key : value - pairs
- There is only one 'Meta =' line allowed in the config file
- Multiple values are '; ' < semicolon >< space > separated values
An example of multiple values:Meta = Nightly-Session: NoReset; Nightly-Cnw.EmailIPAdminTo: [email protected]; Nightly-Cnw.EmailErrTo: [email protected]
Open Source & License
This utility is open source and licensed under a standard MIT license. Download a .zip file of the Nightly Management Utility here
Copyright (c) 2019 Wisebox Solutions Inc.

Permission is hereby granted, free of charge, to any person obtaining a copy
of this software and associated documentation files (the "Software"), to deal
in the Software without restriction, including without limitation the rights
to use, copy, modify, merge, publish, distribute, sublicense, and/or sell
copies of the Software, and to permit persons to whom the Software is
furnished to do so, subject to the following conditions:

The above copyright notice and this permission notice shall be included in all
copies or substantial portions of the Software.

THE SOFTWARE IS PROVIDED "AS IS", WITHOUT WARRANTY OF ANY KIND, EXPRESS OR
IMPLIED, INCLUDING BUT NOT LIMITED TO THE WARRANTIES OF MERCHANTABILITY,
FITNESS FOR A PARTICULAR PURPOSE AND NONINFRINGEMENT. IN NO EVENT SHALL THE
AUTHORS OR COPYRIGHT HOLDERS BE LIABLE FOR ANY CLAIM, DAMAGES OR OTHER
LIABILITY, WHETHER IN AN ACTION OF CONTRACT, TORT OR OTHERWISE, ARISING FROM,
OUT OF OR IN CONNECTION WITH THE SOFTWARE OR THE USE OR OTHER DEALINGS IN THE
SOFTWARE.